Windows 8 To Go
 Windows to Go is a new feature supported by Windows 8. By following the steps below it is possible to create a live boot version of windows 8. Using this USB key you can boot your copy of Windows 8 directly from the key complete with all of your installed software.
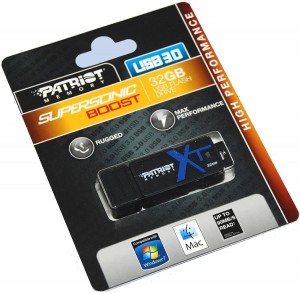
All Steps below were done from a windows 8 PC, This should also work on windows 7 but some of the instructions would vary. I recommend a minimum of 32GB USB3 Key however my completed install came out around 11GB so a 16 GB key would work. I paid $27 for a Patriot SuperSonic XT 32GB USB3.
Windows 8 32bit and 64bit will all work. 64bit will not be able to windows update due to a windows bug with removable disks. 32Bit has this same bug but there is a 32bit open source driver to trick windows into marking your removable disk as fixed.
Step 1: Create c:\wim folder. Download and install the Windows 7 Automated Installation Kit install the kit and copy ImageX from C:\Program Files\Windows AIK\Tools\amd64\imagex.exe or C:\Program Files\Windows AIK\Tools\x86\imagex.exe to c:\wim\imagex.exe. (choosing the right version for your processor)
Step 2:Launch administrative level command from the Start Menu screen. To do this, right click on the task bar, select "Task Manager", select "More details" if the view does not show a tab that says "Process", Select "File", "Run New Task", type "cmd" in the open dialog, Select the "Create this task with administrative privileges", click "ok". (in windows 7 follow the same instructions but ignore the "Create this task with...." step)
Step 3: Insert USB key to computer
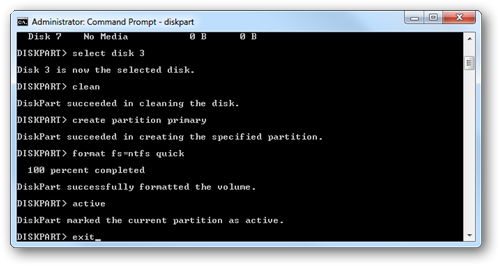
Step 4: type in diskpart and hit enter.
Step 5: Type “list disk” and you should see your usb device.
Step 6: Select your USB drive by typing “select disk #” and hit Enter (DANGER, selecting the wrong disk will result in LOSS OF DATA, you could remove all data on your computer!)
Step 7: Clean the partitions on the disk by typing “clean” and hit Enter.
Step 8: Create the partition. Type “create partition primary”
Step 9: Once created, select it and format the new boot partition, Please note that the partition has to be NTFS, the file and foldernames are to long for a Fat32 partition and will cause the imagex application to crash. Type “format fs=ntfs quick”
Step 10: Set the partition active by typing “active” and hit Enter.
Step 11: Exit Diskpart by typing Exit.
Step 12: Double click on downloaded Windows 8 ISO to mount it in Windows 8. Browse ISO files in Windows Explorer and copy copy \sources\install.wim to c:\wim\install.wim. (if you have original media just copy the same file to c:\wim\install.wim
(if you are using window 7 for this step you will need a 3rd party product to mount the ISO like Daemon Tools or ImDisk, or for the easy way out, burn the image and open directly off the new DVD)
Step 13: Assuming that your Windows 8 ISO is mounted at K: and the USB drive has the drive letter of U:, type "Imagex /Info K:\Sources\Install.wim". This will list all of the editions of window 8 that are included in the DVD image. Depending on your release this may be from 1-5 options. Read throught the XML doc to find the index of the edition you want to install.
Step 14: In the administrative dos window we opened earlier cd to c:\wim and run the following from the folder:
“imagex.exe /apply install.wim 1 d:\
Replace d with the drive letter of your USB drive. If you are unsure of the drive letter check "My Computer". Replace the "1" with the index of the OS you want to install (found above).
NOTE** this step takes over an hour, so go get a drink, and make sure that you have disabled any screensavers and set your PC to not sleep as this will stop the imaging process.
Step 15: Once the image has applied you need to setup the boot record on the USB Drive. Run the administrative command prompt:
“bcdboot.exe d:\windows /s d: /v"
(Replace d with the drive letter of your USB drive.
Step 16: Now safely eject the key using the task bars usb eject. Failure to do this would result in the queue of writes failing. This would corrupt the OS on the key.
Step 17: Put the key into the PC you want to boot windows 8 on, edit the bios to boot from USB before the HDD. (Different for every computer)
Step 18: You should see a picture of windows with an animated round image under. This will take some time to prep the image the first time, it will install applications and hardware devices. If you get a crash dump here its a good indication that the computer you are trying to boot on is not Windows 8 compatible.
Step 19: Install all of the apps you normally use. I recommend a program called "Start8" when installed the computer will boot metro then skip directly to the desktop. Once in desktop mode it will recreate the windows Start menu and populate it exactly as windows 7 would have. (Note that the read/write speed of USB is much lower then the speed of physically installed disk, this will result in much slower software installs however opening apps is only slightly slower)
Step 20: Backup, now that you have your key all provisioned how you would like you need to make a backup. For me the process of creating the image and installing all the apps i needed like office took over 9 hours. I bet you don't want to go through that again. I used Acronis Home installed locally on the USB key to image the drive back to the local disk on the PC. I have also tested the restore to a new key. When running Acronis backup only the large NTFS partition (not the MBR).
To restore the image use acronis to restore the NTFS partition put the key into a window 7/8 PC and from the administrative dos box run, "bcdboot.exe d:\windows /s d: /v". This will create a new MBR and allow the key to be booted.
Notes
- Always shutdown Windows before booting the USB drive on a different computer (you do not need to run sysprep).
-
The USB drive will reboot much faster once the 'Metro' desktop has been reached and all the driver detection has taken place on the first boot on a new system.
-
If you enable Hibernate, do not Hibernate Windows and then try to boot it on a different computer or it will crash!
-
If the Metro Apps don't seem to run, try changing the screen resolution to a larger size - Metro apps only run at a screen resolution of 1024x768 or larger! If Internet Explorer won't run from a Metro icon due to a low screen resolution, run IE from the Windows Desktop IE shortcut instead.
-
The Release Preview 2012 version Product key is TK8TP-9JN6P-7X7WW-RFFTV-B7QPF
-
The Developer Preview version Product key is 6RH4V-HNTWC-JQKG8-RFR3R-36498
-
If you plan on mass producing theys keys in a corporate environment dont forget to SysPrep the image. This will blank out the SID.
Possible Problems
- During the imagex image the process stops with an error code. Check that your USB key is at least 16GB and that you followed the formatting procedure above. The NTFS drive created has to be at least 16GB.
- bcdboot fails. Make sure you are using the syntax on this website. Many sites at a "/f ALL" flag, this will only work on window 8 systems.
- Image wont boot, bios just loads straight into old OS. Bios is not set to boot USB before HDD, don't get confused with USB CDROM and USB device.
- Image boots but crashes, PC hardware is most likely not supported by windows 8.
- USB key works for a time and then gets corrupted and stops working. Most likely your usb key was removed when the OS was running and is now corrupt, only solution is to restore from your backup.
- Installing and opening applications is slow. Make sure you have a USB 3 port connected to a USB 3 key. Past that I recommend disabling the SWAP file and IE caching to reduce reads and writes on the key. If you have done all of those things then it most likely wont get any faster unless you buy a better USB key with a higher read/write speed.
Known Issues
- If your key shows up as a removable device it will not run windows update on the 64bit edition of Windows 8. This is a windows bug and I have not found a solution for it yet. (in 32bit run
- If windows won't activate (or never asked you for a key) you are most likely using the enterprise version. Its looking for a KMS server. To fix run this command at the administrative command prompt: "slmgr.vbs -ipk 00000-00000-00000-00000-00000" replacing the "0" with your Windows 8 key.
- Windows 8's user inteface sucks. Sorry, the only solution I have found is to install Start8 and wait for the first service pack when Microsoft realizes they are creating the next version of Winblows ME.
